Saturday 30 December 2023

More "Oh crap", then "ha ha"

 Lesson 5. We're building the crane's forward arm section. Adding lots of Boolean goodness to make the pieces look more engineered and less heavy.

Once again, I get into trouble. A lot of trouble. I spend an hour on a half an hour lesson. I feel shame, like I'm in one of those practical assessments in A-level physics where I'm in a panic and convinced that everyone else is way ahead of me and have no problems. I feel my confidence sapping away, along with my enthusiasm. Then something happens. The lesson devolves into a series of fixes and troubleshooting. I'm fixing my problems while Riuu fixes his own. Mesh problems are inevitable. You need to recognise and understand them and then understand what tools you use to fix them.

I feel much better because I realise that a lot of my problems have been a lack of fluency concerning mesh problems. I'd either ignore them or, very often, especially when using the Fluent addon, restart the build, wasting a lot of time and energy.

New tools I must not ignore.

A few times, I found myself regressing to default tools. This was a case where Riuu used LoopTools to bridge two insets in the arm component. I've often bridged edges, but this seemed more direct. For my own reference, here is the LoopTools user documentation.

Lots and lots of bad geometry -- mostly fixed.


I ended the lesson pretty happy. The model looks pretty cool. Riuu has a great design sense. He spotted an element of his design that didn't flow properly and made an adjustment part of the lesson.


More Terrains

I took a break by going back to True-Terrain 5. I've made some progress with terrain materials.


Small terrains let you scatter like mad

Flowers!


Friday 29 December 2023

An "Oh Crap!" Blender Lesson

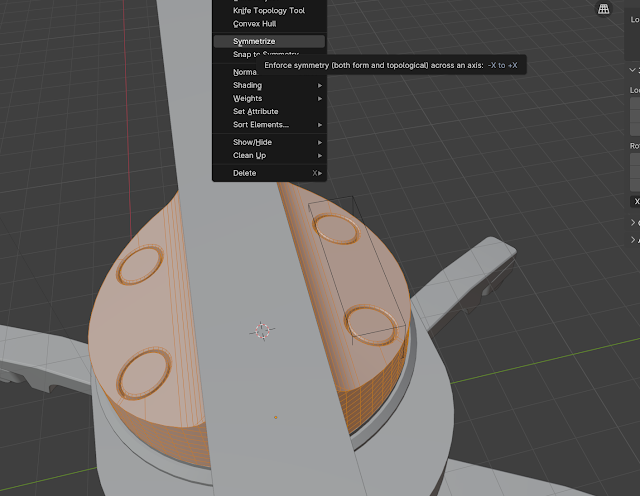
Part four of the Blender Bros Hard Surface Modelling Jumpstart course should have felt like running on wheels, but it was a complete mess. I'd made some subtle errors in earlier lessons that resulted in some badly broken geometry. The symmetrize operation had created hidden extra edges that stopped bevel operations from working. I had to reset the lesson and do some extra corrective steps to remove and rebuild the component I'd built in the previous lesson.


I cut a few corners and made some alterations to Riuu's design, not really to make improvements. We got there in the end, but a fifteen-minute lesson took thirty minutes to complete.

All said, having extra problems meant learning more as I struggled to get back on track. It's all good, as I found my way to the end.

I don't really have any new knowledge to record. Maybe the creation of new elements by selecting and separating parts from an existing mesh. I haven't done that enough!

It is as follows:

1. Select an element.

2. Shift+D to duplicate.

3. Then, this part is different for me as "P" doesn't let me separate. Instead, I right-click and choose "Separate". I wonder if this is another change you get from having Hard Ops installed?


I was going to try to finish this free course today so I could jump into the full Accelerator course. This lesson was a spanner. I'm going to slow it down. If the next lesson goes wrong I might restart the course and pay more attention so as not to carry over errors.


Thursday 28 December 2023

Land ahoy!

 Busy day taking my youngest to a birthday party. I had a little time this evening to build a couple of heightmaps in World Creator and have a play with it in True-Terrain 5.

Scatter madness!

This took some configuring. I had not tracked the impact of the scatters. As a result, this was originally going to include millions upon millions of scattered objects. Naturally, it took an hour to compile the scene, then suffered an out-of-memory error.

After the rains

I need to create a whole scene, not just scenery. I've been thinking of doing a scene featuring crashed cargo canisters and thousands of tins of space beans. Watch this space!


Wednesday 27 December 2023

Another "HOLY CRAP!?" Lesson at Blender School

 
The course model really starts to take shape.


In this lesson, we built the crane's body. I went wrong again in various steps. Although I'm learning a lot of basic stuff, I'm not a noob; I was able to work my way out of each problem.

Geometry repair


This lesson included steps that use the MACHIN3tools Smart Vert tool. You suddenly realise why the trainer, Ponte Ryuurui, insisted that we install and use this addon even though the course is supposed to be limited to the vanilla Blender toolset. 

So we've applied various Boolean operations and chamfers, and even when being very careful not to collide operations, you'll occasionally break your geometry's flow.

We checked the edge of the component to find where edges didn't flow.  We'd select vertices that should be joined and press "1" to connect them or "Ctrl+1" to join them at the centre.


"1" to join one to the other. "Ctrl+1" to move both verts to a centre and then join them.

Another Holy S**t moment

Symmetrize is a tool that I had never used. I had the mirror tool. Why would I need to symmetrize a mesh?! Well, the Symmetrize tool applies a mirror operation for the specific purpose of making a mesh symmetrical along an arbitrary axis. The mirror tool can produce the effect of the Symmertrize tool, but you need more configuration. Symmetrize is more direct. It's applied directly to your mesh as a destructive operation, while Mirror is a modifier effect that isn't destructive unless you apply it.

The moment of truth that I had absolutely massive holes in my basic Blender modelling knowledge.

Tuesday 26 December 2023

Boxing day


I had twenty minutes to play before going to see family. 


Just playing. I added a volume to catch the rays, but it needed tweaking.

Very annoyed

I got an email from the Blender Bros at 11pm. I made a note to check up on it first thing in the morning as I was having an early night. In the morning, I read that their 40% discount on the Hard Surface Modelling Accelerator course was ending in 6 hours.

Who gives just six hours warning for the end of an online promotion. You're always going to catch potential customers sleeping through the night. I wanted to finish the free course before making a final decision, but to be honest, I'd already decided that I'd buy the course.

I thought that the course was probably worth the full price and that I'd end up buying it at some point.

Less annoyed

I was on the way to visit my sister and her family, staying at a rental property close to us. I checked Facebook and saw the ad for the discounted course. Was it back, or was it an error? I followed the link and it was going to let me buy at the discounted rate, so I did. Was the temporary end of the promotion a mistake or a sneaking sales tactic? I don't know, but I'm glad to have the expanded course.

I've decided that once the Accelerator course is complete, I'll probably buy their introduction to Hard Ops and Box Cutter.

Saturday 23 December 2023

Blender School: Weighted Normals

 Something that came up during the Blender Bros course that I'm doing is the use of a weighted normals modifier. I'd completely forgotten that this was a thing. This morning, I woke up with an urge to understand what exactly it is doing and why.

So, I remembered learning about it during an earlier course that I didn't complete:


I'd watched this video before, on the week that Creative Shrimp's Hard Surface Modelling course was released in 2018.

When you assign weighted normals, the size of a face impacts how shading is applied to edges. When normals are averaged, they can result in a weird, edgeless effect or related artefacts that you often get when there is insufficient geometry to tell the shader how it should handle particular edges.


Blender School: A base for the legs

 Well, that was like having my teeth pulled out. I got into a right old mess. It's probably down to me incorrectly ordering and or managing the parenting on the leg and then the leg's instanced copies. Most of the modelling operations were done okay. Just variants of the first part. 


Some key things:


Building up logical collections with "M" works well and makes complete sense. I've always done a "clean up" session after modelling "in the flow", choosing to not do any housework while actually modelling just builds up work for later. I will see if I can become more organised in making collections while modelling.

Copying mesh elements is also something I didn't do. Taking a few faces, Shift+D to make a copy, then separating, then using the new element to create a referenced component. 

It's unlikely that I'll be able to do the next lesson for a while as it's Christmas!!


Blender school: a leg thing

 This Blender Bros course runs through the modelling of a futuristic crane. Component one is a support leg.

Support Leg - part 1 of the Blender Bros Free Solid modelling course

 In truth, I could have modelled this part with my eyes closed. However, I wouldn't have used booleans quite so effectively. I wouldn't have used the bevel and then used some deeper functionality to split the bevel operation. So modelling job one was well worthwhile. In fact, I might need to repeat the steps to really get my head around some of the later steps. 

More things

More natural-looking terrain textures. This took a while, and it still needs some improvements in terms of "bush and shrub noise". It is much improved from my earlier efforts. 


I challenged myself to only use one texture, so all variations in this terrain come from filtering, scaling and masking. 
One texture to rule them all

The challenge of big noise


This effort helped to clarify an important requirement for terrain texturing. Terrains of any reasonable size have large-scale noise, not just the shift of textures that you expect to see from cliffs, rocky outcroppings and scree banks. There are countless mechanisms at work: seepage and sediment build-up, the effects of wind and moisture, and so many more. True-Terrain 5 has some really powerful tools for masking and noise-making, but you really need to work hard to ensure that these tools produce natural-looking results that create the illusion that these natural mechanisms have been at work.

Friday 22 December 2023

Back to school. Blender Bros free Solid Modelling Course


Back to Blender School

So I'm 10 years in. I should be a Blender expert. Instead, I'm a veteran who stopped learning and hobbled around the workflows with a small number of learned workflows for years and years.

This changes! It's a resolution for the new year that I'm starting on early. I'm going to try to maintain detailed notes of key lessons here in this very blog.

I'm setting myself a challenge that by the end of January, I will have completed two major Blender courses. Yesterday, I started the Blender Bros Hard Surface Modelling free jumpstart course. This is not a major course, but it's a good taster before investing in their heavily discounted Accelerator course.


Having completed the introduction to the introductory course, here are some things I've rediscovered:


MACHIN3tools

MACHIN3's free toolset for streamlining the most basic Blender operations. I already had this and installed it, but I ended up not using and removing it. I didn't use Blender regularly and only used MACHIN3tools for a short time. As a result, muscle memory kicks in, and the changes this addon makes cause confusion.


Tab change:

The tab key is the most fundamental step in Blender modelling. It switches you from Object mode to Edit mode. Once you are in Edit mode, you then select a context: Vertices/Edges/Faces.

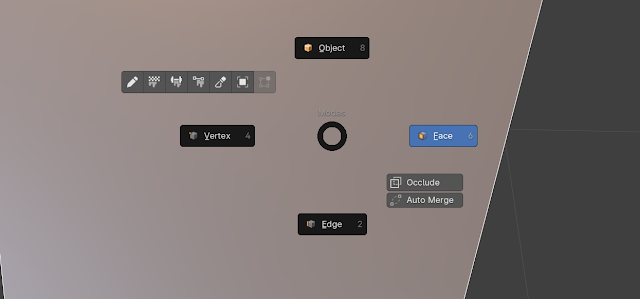
With MACHIN3tools, this changes to a pie menu. Now, going into the menu, you select an Edit mode context, or if you are in an Edit mode context, you can select Object mode.

Tab select, Edit mode context select.

In an edit mode context, leave by selecting Object.


The first few times, this has already caused my brain to hurt. It's a significant change, but once you get it stored in your muscle memory, it means fewer clicks for things you do all the time. Previously, I didn't use it enough, so it tripped me up every time I used Blender.


Local mode

How the hell did I forget about local mode?! This takes you into the thing you are working on, hiding other stuff in the viewport.

Keyboard: "/" key.

I'd been using the hide command to isolate a target mesh. This is simpler. Firstly, this is a toggle. Hide needs a separate unhide control. Unhide, in its main use, unhides everything, including things unrelated to where you are working.

Next up.... a lesson about making a leg thing.


Thursday 21 December 2023

Rockify Update!


Rockify (See it in the Blender Marketplace) is a recent Blender Addon acquisition. It's a rock formation generator - not so much for boulders but for the kinds of structures you see in cliff faces. It's easy to use, and when the bundled Substance Painter smart material is applied to your rock, the results can be really good.

Well, there was an update a couple of weeks ago that added two more rock types. Now, there's another update that professes to be Blender 4 compatible. 

New rock types and more controls.


Christmas time...

 I'll be heading off to my inlaws for a pre-Christmas celebration. I'll be doing less Blender - likely no blender for a few days. I did think about investing in a Blender-capable laptop, but it's a huge outlay of money for a couple of weeks a year when I'm not at home. I even thought about getting a Macbook Pro for whatever work I do. Next; that would be great for Blender, no doubt.

Currently in Blender...


Testing a simple terrain sculpt..I went too far with the details.

A two-terrain scene. Background terrain not working out.

Giant single-terrain. I was unhappy with the erosion treatment on the background 

Stranger places


So, quite a lot of effort, but nothing panning out. 
In other news, True-VFX showed off one of my renders in a credited tweet.

Monday 18 December 2023

10 Years of Blender!


Let them see cake! No, don't try to eat it.

While Blender itself will celebrate its 30th anniversary on January 3rd, today I reach my own 10th Blender Year!

Hurrah!

You can see the day marked in the very blog: Welcome!

It's sobering to think of the time wasted. How much more I could have learnt had I kept watching tutorials and pushing beyond my very limited comfort zone. Righting this will be a new year resolution. Learn more, do more. Do it better!


Roamer!

Saturday 16 December 2023

Back to True Terrain testing

 
A new alpha dropped Friday evening. I promised myself that once installed, I'd only spend a few minutes testing. Well, two hours later, I found myself walking along a frozen stream on an alien world.

True-Terrain 5 alpha 34 

On Saturday, I tested a scene using three separate terrains - a foreground, midground and background. Great for getting depth and allowing for an easier time with dense scatters.

New low-poly alien plants

I built a low-laying terrain in World Creator, exported it as a height map, and loaded it into True-Terrain in all its 1GB glory. It's just too wacky, and although the scatter is nice in areas, it's too much of the same. It needed some break-up elements. Maybe a few trees and a point of interest.

Scatter madness!

Thursday 14 December 2023

Christmas projects


I blocked out a Santa robot. Not a serious project and I hit my time-box limit before completing any of the finer details. Think of it as a Blender sketch. Ho Ho Ho...<spark>


I spend a whole day failing to do justice to my giant desert terrain. I might have another go, or I might try to practice on something smaller first.


Rockify got an update! Yay!

I'll have a proper play with it today. It includes two new rock types, although one of them produced a very big mesh out of a lowly sphere. It is not one to apply to a big mesh, or it will cause a crash. I saw this happen with my own eyes!


Tuesday 12 December 2023

Back to formula for terrain materials

I'm not happy!!

 I spent a lot of time trying to get satisfactory terrain materials. I am getting to understand the many options for layering, masking and filtering -- it's a powerful toolset, but  I'm not making adjustments through an artistic process. It still feels like I'm making arbitrary changes, looking for "cool".

So onwards! I'll try again tomorrow.

So what do I do when I'm unhappy with the terrain materials? I turn on the fog and the volumetric lighting and splash open waters here and there...

Reaches for sunglasses


Monday 11 December 2023

I found a bug in Blender

 I raised a humourous request with True-VFX relating to a checkbox that only responded if you clicked on its left side edge.


Well, it turned out to be an actual bug in Blender. Zach from True-VFX identified that it was erroneous behaviour that happens if you locate a checkbox outside its layout bounds. It's not an earth-shaking bug, but I feel like I should earn an achievement badge. <smirk>


Playing around today:

I was playing around with ground materials.

Superimposed elements from a different render to add more sky drama

Potential Christmas image coming. 

Sunday 10 December 2023

So. Much. Testing.

 I've continued testing True-Terrain 5 to the point where I'm starting to go over the same workflow steps, repeating things a lot without getting much for my time.

I figured out the steps for importing splat maps. These are image files that contain masks for terrain textures. This method is more memory-hungry and less flexible than True Terrain's built-in masking system. It can be helpful if you use a third-party terrain generator such as World Creator or Gaea that generates masking data you want to import into True Terrain 5. 

Settings for bringing in a splat map file as a terrain mask

Flow lines generated in World Creator -- you can generate these in TT5, probably at a much lower memory cost.


Monster Terrain file

I managed to import four tiled height maps that had been generated in World Creator. Each 256MB file was imported into a single terrain, then aligned using the transform tools, then masked with an "add" function. This created the biggest terrain (in terms of data, not dimensions) I'd successfully and usefully loaded into Blender -- I'd occasionally managed to load terrains in, only to find Blender unresponsive to the point where you couldn't do anything. I was able to work this this 25million vert monster!

Great landscape rendering isn't about file sizes. You should always be looking to do things more efficiently because it's faster to work with, faster to render, and probably more stable. That said, it's good to push the limits. In this case, I got VRAM Out-of-memory errors when I pushed it up one more notch.


Quick Tests


The following quick test scenes were all part of this week's efforts:


Geo-scatter covering up subdivision-enabled details - a bit of a waste then.

I need more practice with material masking

A lake in the mega terrain

Earth noise!

Tuesday 5 December 2023

Focus: testing and clouds

 I'm still putting a lot of time into testing True-Terrain 5. I have always loved modelling landscapes. Three dimensional places, in games and CGI art have been a constant fascination since the time of VistaPro, a procedural generator on the Amiga, in the 1990s.


Yesterday, I spent rather a lot of time looking at clouds. The VDB type. True-VFX's True-Sky can give VDB clouds a fringe in some situations. I was looking at the cause. Richard at True-VFX thought that the issue could be solved by changing the default space for a VDB from object to world. This turned out not to be the cause for my examples.

The dreaded sky fringe clouds - a reaction to True-Sky's atmospherics?

Conventional wisdom (and BD Design's tutorial on YouTube) state that the following parameters will balance nice looks against slow processing/rendering:


On the rendering panel, under Light Paths > Max Bounces:

Volume sets the maximum number of light bounces for scattering. The higher the number, the more light is scattered through the cloud, making it less dark.

Volume 0

Volume 128

Max Steps is the maximum number of steps in a render before the process gives up, kills the light ray and moves on. Increase the number to protect against excessively long rendering times.

Maximum Step Size 2

Maximum Step Size 128


Space sets whether a volume has the same density and detail regardless of its size (object) or adjusts these parameters based on the world (world). When set to world, increasing the size of a volume will result it its density and detail increasing. When set to an object, increasing the size of the volume will not impact density or detail.

The Step Size is a property of the actual volume rather than the render engine. It sets the distance between volume samples. Smaller makes for more fine-grain volumes. The default of 0 tells Blender to use the voxel size. I'm told that there's no point going below a step size of 1 for VDBs, you won't get any more data out.

Going with the high detail (Step Size 0), you see the voxel "steps", rather like the volume is a giant Minecraft construction.

Step Size 0

Step Size 24

    Pushing the step size to 40, the detail is washed away, and renders are a bit faster, but steps are gone.
Step Size 40


References:


A great tutorial on note setup for great Clouds (with some mention of render settings):


More house

This morning I showed Clara the "dream" house. She had some constructive criticisms of the design, including a wish to have direct...