Friday, 12 January 2024

Blender School - Design Rules

 I've reached a section of the Hard Surface Modelling course that deals with fundamentals. It has nothing to do with Blender itself, but it is critical if you want to use it as a design tool for creating cool objects.

Balance

How a design combines different elements harmoniously. Symmetry and asymmetry are used to give a design a sense of order and stability, but balance need not be based on perfect symmetry. Elements can be balanced in different ways. For example, put more mass lower down, and your design will look more stable.

Other balancing elements:

  • Framing
  • Avoiding attention pullers or a lack of focus
  • "White Void", the use of negative space, can transform the presentation of a design. A design can breathe and live when provided with a space. Give the viewer a place to rest their eyes.

70/30 Rule

Within a design, we seek to create compositions that place 70% of its space towards visually simple space, leaving 30% for the fine details. A composition that contains more details can be visually overloading.


Emphasis

This is the use of visual anchors to pull a viewer's eye towards a design element. Chain together visual elements that will draw the viewer's eyes across the design in a satisfying manner.

Level of detail: Primary, secondary, and tertiary details.

There are lots of different elements that can be used for emphasis, colour, sharpness, position, texture, and more. Each can be used to form a star constellation of visual pulls.

Just remember, use carefully - using too much emphasis is the same as losing emphasis.

Variety

Find the balance! Too much variety can be distracting. The right amount of variety adds interest and appeal, but if you go too far, you will not be effective.

Avoid "sandwiching" -- repetition of elements that build monotony. It happens when you try to fill space without doing the heavy lifting of good design.

Movement

Strategic placement of visual elements or leading lines will move the viewer across the design.

Movement begins "top-left" and follows visual anchors across a composition. The longer you capture the attention of a viewer, the better.

Direction can be used for story building -- taking the eyes on a journey. 

Proportion

Size, scale and proportion. Using reference elements to set the correct space. The ratio of elements can be important in setting proper proportions.

Unity

A unity can be created through the use of consistent patterns and themes. The highest level of echoing. Don't overuse kitbashing, as they are likely to create conflicting patterns that break unity.

Blender School - Topology

 
Today's lesson: Topology.

This is important. Building in Blender can become very frustrating if your model contains bad topology. My models often do, so I'll be taking notes...


1. Topology vs Geometry

  • The topology of a mesh is concerned with triangles and polygons, which include quads and Ngons.
  • The Geometry of a mesh is concerned with vertices and edges.

2. Shading problems

  • You can't make a triangle non-planar, so it will never exhibit shading errors.

  •  If you put a crease in a quad or an Ngon, it will result in shader problems as the shader engine tries to deal with an edge that isn't there. Ngon issues are more obvious as you'll often see multiple triangular elements.

  • In more complex meshes, shading problems happen when there is a break in the flow, which results in the shader producing uneven effects.
3. Common topology problems
  •   Non-manifold geometry, such as internal faces that are hidden in the viewport but become apparent if you go into normals view. A telltale sign of this is if edges refuse to be merged because they are supporting a hidden face.

  • Flipped normals occur when an operation on your geometry pushes some elements inside out, so that the normal points inwards instead of outwards. Quick fix: Select all faces, then Shift +N.

  • Disconnected geometry is also hard to spot in the viewport. Easy fix. Select all vertices, then M to merge.

  • Overlapping geometry is very common, usually as a result of a bevel that goes too far. Again, merge vertices if it happens, or ensure that you clamp the bevel to avoid overlaps.

4. Common shading problems
  • Autosmooth isn't enabled. Easy fix: enable it.
  • Boolean operations on a curved surface. Add more edge loops!
  • Customer Split Normals - If the auto smooth is greyed out, the problem may be caused by Custom Split Normals. You can delete them under the data tab, in the Geometry Data panel. 
  • Bent geometry, as mentioned in shading problems. 


Thursday, 11 January 2024

Blender School continued - Some more lessons

 Today's lessons taught me a bunch of stuff.

Booleans!

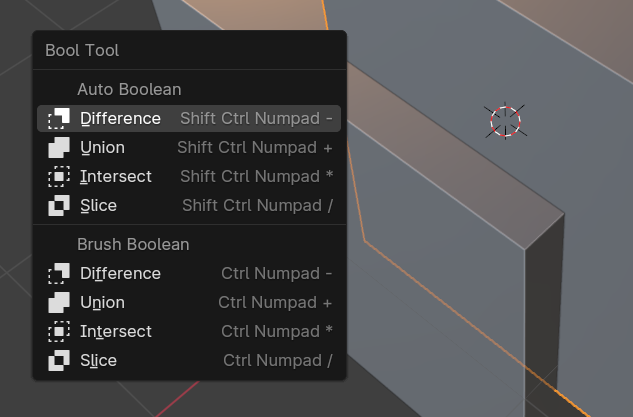
Bool Tool menu:

Ctrl+Shift+B

Suddenly, I realised that the default mode for Bool Tool is "Brush", which leaves the cutter in play. Lots of times, I want the operator to be immediately applied... So it's Shift plus the Brush keyboard shortcut. Easy!

Boolean Topology

1. All Boolean operations need two connecting edges. Take note that if these connecting edges are not perpendicular to the Boolean's edge, it will cause problems if you try to add a bevel later.


2. No-manifold geometry

Boolean operations may produce unexpected results if applied to non-manifold geometry. That's a mesh that contains gaps or places where parts of the geometry intersect with itself.

3. Use "Exact" mode for Booleans. If your cutter and target have faces that occupy the same place, you might get Z-fighting, where Blender doesn't know which face to render, giving you a weird "both faces render at the same time" issue.

4. Booleans can create Ngons, which break the flow of your mesh topology -- bad topology! Keep an eye out and deal with it if it becomes a problem for your model.

5. You can apply Booleans to your cutter.

Tuesday, 9 January 2024

Back to Blender school!

 More really basic lessons for things I had forgotten or just forgot to use.


Flying through the basic command lessons. These are all a couple of minutes at most. It's really basic stuff but some of it hadn't stuck, so I didn't use it.

View selected object:  Number Pad Period.
How can I not be using this all the time?!

Repeat last command: Shift+R
I'm sure this is really useful although I feel like I've survived without it...

Visibility

Hide selected object: H
I am using this but not it's inverse:

Hide the inverse of your selection: Shift+H

Local view: /
My new best friend! Remember its a toggle.

Bool Tool

Slice:

1. Select both objects
2. Ctrl+ number pad slash
3. Instead of applying one object as a cutter, both objects are cut out from each other, leaving both objects cut from each other.

I don't know why I lost track of the Bool tool. I didn't use Booleans quite as often as hard surface modellers now do.

Installed Modifer Tools


A simple addon that gives you some global commands for applying to all modifiers, such as applying all modifiers with a single click.


I just hit 25% of the course. Getting there!


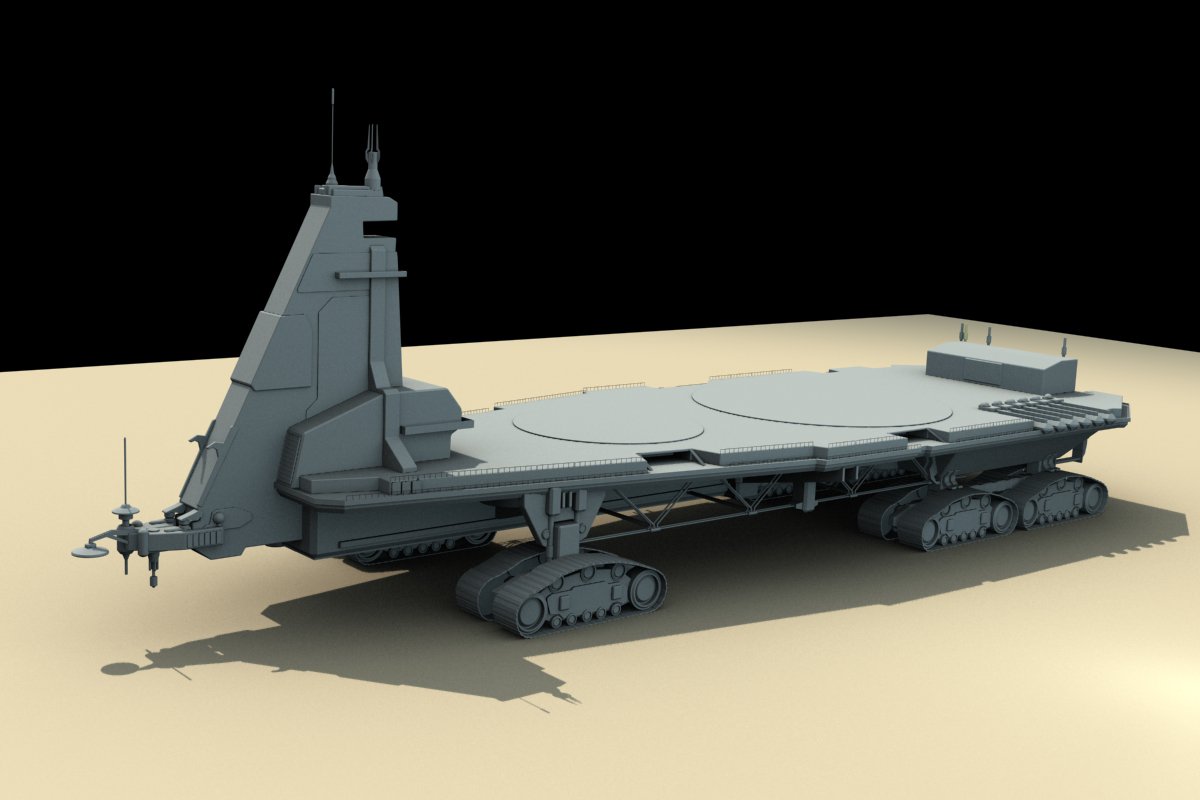
Mobile Starport Progress


I'm pretty happy with where I'm at. I had to stop working on it because I could feel my attention to detail was slipping. This would be the point where I'm adding stuff without thinking deeply about what I was doing. I'd add elements, but they wouldn't really be working.

I'm still toying with the idea that I will completely rebuild the track trains/bogeys. We'll see. They could do with being a bit more chunky.


Thursday, 4 January 2024

Blender School: Oh Snap!

Next lessons: Snapping 


I'll be honest: I've hardly ever used the Snap function. I've usually wiggled things into position without a lot of precision. It's time to do things properly.

This is what Blender Bros. Josh taught me about snapping:

1. You can invoke snap by pressing Ctrl while moving an object. The movement will adhere to the current Snap type, increments by default.

2. While increment means that you snap to your scene's grid, the other snap types relate to other objects in a scene. Vertex snaps to the vertex of another object, likewise with a face.

3. If you select Face projection snapping, you need to tick  Align Rotation to Target. That said, I'm not yet sure how you get this to work in the expected manner.

Most of the time, you'll be using vertex snapping because it's quick and precise.


Origins and Cursor


Very important!

Yet another super-useful pie menu from Machin3tools:

Shift + S


The 3D Cursor is an arbitrary point that you can place anywhere in the viewport space. It has X, Y, and Z coordinates. You place it with the mouse. Point to a location and press the Shift+Right mouse button. The cursor is used as a placemark, where you can move an object or an object's origin to it.

The origin is an object's median point; essentially, it's a dot at the object's centre. This is used as a reference point for any kind of translation. You can move the origin for things like pivot operations.

Tip: Shift+S, then Cursor to Origin, will return the 3D cursor to the VP grid's origin if you don't have an active object selected. Useful if you want newly created objects to appear in the centre.

Move to Origin, for example. This will move the cube's origin to the current location of the 3D cursor. This can be helpful if you want an object to be associated with an external point, maybe for pivot operations. Some modifiers and other operations work from an object's origin.


Mobile space port

 I occasionally like to go back into my past projects and create an update. Take an old idea and apply newer skills and higher proficiency. It's that time again. 

Mobile spaceport

2010 Pre-blender (3DS Max 4)

This vehicle wanders along the bottom of deep canyons, looking for ice fissures from where water is collected and converted into starship fuel. It's a monster-tracked vehicle which originally would have supported a whole population. Cool idea, but I gave up on this version as I couldn't figure out how to make it into a township with lots of surface buildings.


Time to try again!

Early days. I've not used tank-style tracks this time. It's four massive bogeys on which two triple-tracked trains are mounted. All this detail will probably get lost when the main hull sits on top of it.                                               


Wednesday, 3 January 2024

New course


The Hard Surface Accelerator, again, from the Blender Bros. They really know their Blender onions, although the course mistakenly applies some bad assumptions -- configuring Blender specifically for Hard Surface modelling. The idea that I'm some young whippersnapper hungry to break into the world of DCC. I think they could improve their game by being 20% less "Bro".

That said, it's so far been good content; it's solid foundational knowledge.

Let me record some basics about the Transform Orientations tool.


Transform Orientations

Crucial tool in the Object Mode. It tells Blender which set of coordinates to use for any transform operation you apply to a selected object.

Global: That grid system which has its own X,Y, and Z axis. The global coordinate system doesn't move.

Local: Your object's own axis. if your object is moved so it's no longer aligned with the Global coordinate system, use this. The coordinate system moves with the selected object.

Normal: This coordinate system is used in edit mode and applies the coordinate system to the normals of selected faces. One use for this is flattening out the faces by selecting them, applying the Normal coordinates, then selecting S and C, and scaling until all the faces are flattened.

You can also use the Normal coordinates to edit a landscape mesh, selecting faces and applying transforms along face normals.

Gimbal: This is a very niche coordinate system, mostly used when operating in the quaternion coordinate system, which handles rotations with an additional axis, without which Eulers get you into trouble. See Quaternion or Euler, understanding rotation. It's complicated, and it's mostly for animators.

View: Aligns the coordinate system to your current view. Moving the selected object along the Z axis is like performing a zoom.

Cursor: Align the coordinate system to your trusty 3D Cursor. Adjust the cursor's orientation from the View tab.

Parent: Previously, you'd need to select parent, snap and orient the 3D cursor to select, select the previous child, and set transform orientation to the 3D cursor. Now, you have the object to set the coordinates to that of the parent object.

More Terrain, always, it seems

Playing with atmosphere and Geo-scatter


Monday, 1 January 2024

Course complete!


Blender School - a lesson that has taken me 10 years to learn

 I decided to complete the final lessons so I could move on to the main paid-for Accelerator course.

It's all basic stuff. I'm watching, but I can't be bothered to follow step-by-step as I'm not learning anything. Then Ryuu does something that I didn't think was possible. This is something I've wanted to be able to do since the very first time I started using Blender.

So here's the trick:


1. Apply a material to part of your model.

2. Invert your selection: Ctrl+I


3. Shift+Click on the component on which you just applied a material. Click on the material options down Chevron. Select Copy Material to Selected.


4. BOOM! Oh, how much time would I have saved if I'd known this in 2014?!


Right, I'll carry on with the lesson now.

Blender School: Modelling complete

 I caught up with my Blender Bros training course, completing steps six and seven, which finish off the modelling. These last two lessons really just reinforce what I learned in the previous lessons. Good to reinforce!

I think the biggest benefit was further fixing steps. We Boolean a cable pipe into the central components curve, which produces an unholy mess in the geometry. We then dive in with our Machin3tools and get those vertices aligned/merged/dissolved. I love how symmetrize lets you complete work on one side of a mesh and then apply the changes to the other side.  

Naturally, I went off the rails a few times, but nothing where I was left phased. I made a few changes to Ryuu's design, just where I felt I wanted to go in a slightly different direction. 

Step-6 Pipe details

Step-7 Claw and grill

The next lesson will cover materials. There's plenty for me to learn there!

More Terrain

I just can't stop playing with True-Terrain 5.

Big but simple terrain - a desert

Small but detailed terrain - pretty flowers


Wild Geese

  A honking double-wedge of geese just flew over the house. The cacophony jolted me away from my coffee and reminded me that it's the fi...